Saturday, May 12, 2012

How to Shade Flower Petals in Watercolor


Shading flower petals in watercolor is easier than it looks. Controlling edges so that some edges are clean and hard while others are soft and gradual takes combining Wet in Wet techniques (for loose, soft flowing edges) and wet on dry - by a very simple process.

Below is a line drawing for a Bird of Paradise flower. I chose to use a Pigma Micron waterproof pen for the drawing so that it would scan easily and also to make it easier for readers to copy. Please feel free to copy my outlines or print this out to try coloring it. The lesson here is about shading, not about how to draw the outlines of a Bird of Paradise flower in detail. If you want to do a different flower, feel free to blow up the photo reference and trace outlines with a pencil, then transfer them onto watercolor paper.

I drew and painted this on my 7" x 10" Stillman & Birn Beta journal, which has bright white 180lb Rough watercolor paper. You may get good results with Cold Press (medium texture) or Hot Press (smooth) watercolor paper instead. The journal pages don't have the big dips and bumps that other brands of Rough watercolor paper do, just deeper dips and taller bumps. The smoother your paper, the easier it is to get a clean line with a pen or pencil - or the edge of your wet area.


The simple trick for shading flower petals is to just wet the area of one petal at a time. Get it good and wet so that it's shiny. Let it soak in and add a little more water so it's still shiny. Stay within the lines if you want those lines to turn into hard-edged forms, like the outside edges of a classic botanical painting against the white background.

Here, I'm using a Niji Waterbrush to wet just the big outer sepal, the leaf-like structure the flower springs out of, and the thick stem. There's a lot of shading in that structure and a variety of interesting colors flowing softly into one another, so that made the best example.


Below, I've swiped my Niji Waterbrush through the Payne's Grey pan and dipped into the Pthalo Green pan to get a greenish dark gray. I'm bringing the color all the way up to the edge of the wet area, but not over the whole structure. Just at the edge where I want that color to show. Be sure to pick up lots of color on your brush. Watercolors dry two steps lighter than they look when they're dry, so if it looks too light, add more color quickly before it dries. Don't be afraid to go too dark because it'll probably turn out fine.


Now I'm adding a band of the next color. I put a band of strong Pthalo Green overlapping the previous layer to make it darker, then I added a stroke of Olive Green right next to it to let the colors mingle. You can put rows of different colors, even complementary ones. A petal that's dark violet on the outside can shade gradually to almost white and get some golden yellow charged in right at the base. Or a rose petal can shade from pink through orange to golden yellow along its shape. Just paint each separate hard edged section as its own project.


When the petal or leaf is finished, let it dry completely before doing an adjacent one. I moved from doing this big petal to painting the orange petals, then while they dried I worked on the blue one, then I finally mixed a thinner mixture of Paynes Grey and green to shadow the waxy white structures connecting the orange and blue petals to the base.

Then I signed it with the pen. If you use a pencil for your sketch lines and work lightly, they can be erased sometimes after the paint dries. If you use a watercolor pencil lightly and do have color right up to the edges, you can dissolve the lines into watercolor and look as if you did it entirely without a sketch.

Another option is to use a light box. Put your line sketch under your watercolor paper and paint with the light box turned on. Then no outlines show under the watercolor and everyone thinks you've got miraculous brush control!

Enjoy this technique! Either try it with my Bird of Paradise sketch or try it with a simple flower that has several large, shaded petals. I will discuss other ways of shading with watercolors in later articles. For now, this is how to get smooth wet-in-wet color changes in a limited area.

Just wet only that area and paint whatever colors work for you. It really is that simple!

Saturday, May 5, 2012

Pen Drawing Challenge

"A Page of Little Ari"
9" x 12"
Pitt Artist Pen - black brush tip (regular size not Big Brush)
Lanaquarelle 100% rag watercolor paper.
From life.

This page of life sketches of my cat, Ari, looks so simple. I've drawn this cat hundreds, maybe thousands of times, most of them while he's sleeping so I can get him to hold a pose for at least two minutes rather than two seconds or less in transition to a new pose.

Why this is a serious challenge is that I did it as an art trade with a professional artist, my teacher, Charlotte Herczfeld. Along with several of my pastel paintings, I answered her request for "A page of little Ari's, just the pen drawings you do in your sketchbook." She likes them. I post them constantly. I still suggest you choose something you really love, or someone you love, and sketch that beloved subject hundreds of times in your sketchbook.

Try to get used to drawing in pen without penciling or correcting pencil sketching first. It teaches boldness. Don't worry about mistakes. Don't plan it. Just start in your sketchbook page, draw what you see, keep it less than five minutes per drawing and do lots of them. If it's a pet or a person, let them move every two minutes so you get used to sketching a moving target.

Once in a while for fun, try drawing that subject from memory and compare to your life drawings.

The challenge of composing an entire page of life sketches in pen without corrections, preliminary penciling or using photo references is harder than it looks. The first few go on easily by habit. But laying out the space well so that the drawings create something like a visual path, so there's something of a focus in the whole and the page as a whole looks good - that's the big challenge.

I was inspired by pages of Michelangelo and Leonardo da Vinci's drawings all my life. Somehow these great artists filled the space perfectly. Sometimes the drawings overlapped but not in a way that obscured any of them. Leonardo combined subjects regardless of what they were - a human foot, a plant, a bit of machine, a pretty girl's face could all be on the same page and somehow make sense. A bit of a statue and a bird's wing would overlap and still make sense.

That's not what this page is. I just placed them carefully and varied the size within a range. The farther I got, the tougher it was to keep going with my original discipline of no pencil, no erasing, no corrections, no layout lines. I wanted the Page of Little Ari to have the genuine spontaneity of the many pages in my sketchbook that accumulated one or two or several Little Ari sketches.

Unless you've drawn your main subject hundreds of times, don't expect your page to be perfect. Just try it once in a while. It doesn't all have to be the same subject either - you can try to combine subjects the way Da Vinci did and it's fine to vignette just portions of a subject or overlap them in interesting ways. That'll be my next challenge. This wasn't my first page of small sketches on a large page that laid out well. I did dozens of line drawings of random fruit and flowers so that I could paint them with samples of Daniel Smith watercolor in a large Moleskine watercolor journal. I think it was close to 9" x 12" and some pages of it were on various watercolor pads that size.

I still haven't tried overlapping, but I will in future. Use any sort of pen you want unless you're going to sell or trade the page to someone you respect. The archival materials were because Charlie's going to frame and hang this Page of Little Ari - but yours doesn't have to be as permanent unless you want to frame it or it's for someone else. Just keep trying in your sketchbook for "a beautiful page."

Please feel free to post links to your pages and page layouts in the comments to this entry. A good place to post them is the Art Journals forum at WetCanvas, an art community where a number of my friends do absolutely gorgeous multi-image journal pages that inspire me. If you're new to the community, you need to join, be approved by admins in a day or two (it's big and they're busy) and then post three text posts before posting any images. Comments on other people's art are a good way to get reciprocated attention and support when you're a new member, so is an introduction post.

I'm very proud of the Page of Little Ari. I have a beautiful model whose soft foot rested on my shoulder a moment ago while he was grooming his luxuriant fluffy hair, and I have lots of practice drawing him. When you draw what you love, that's when you'll improve the most and be able to accomplish great things!

Thursday, April 12, 2012

Breakthrough on New Supply Freeze


There should be a Latinate phobia name for this reaction. Artists from beginners to experts seem to run into it so often that it should have its own term. You buy something new and wonderful like Pan Pastels or Derwent ArtBars or Roche' pastels (the world's most expensive at about $16 a stick!) and then the happy package day arrives. You tear open the box like it's Christmas morning and you're seven years old again. Santa still loves you and wow, the fat man knew you loved color best of all.

Then comes the New Supply Freeze.

It's a sudden panic attack. How could I have bought 72 Unison pastels? Unisons! Those expensive hand rolled ones! In the fancy aluminum case no less! OMG these things are so perfect - how the heck can I ever get good enough to use these perfect hand rolled unbelievably awesome and expensive supplies. I tanked my savings getting them. I stretched my budget to the point of breaking. Now the magic brush/stick/pen is in my hand, I know I'm nowhere near as good as the artists I saw using them on YouTube.

That panic isn't just you.

Artists still feel this on up into their professional careers. Award winners sometimes feel this way about expensive brand-new supplies. The first page in a Stillman & Birn art journal or a Moleskine notebook, when you know you could've just got the cheap ProArt spiral bound one for sketching does that. Or the first use of an expensive sanded paper, or a new linen canvas with a fine portrait weave. Whatever it is, when you upgrade your art supplies to a new level, try a new medium and get the best available supplies, there's a natural terror that you're not ready for it yet.

Also, coming in from outside in a lot of social pressure surrounding myths like Talent, there's the panic that you may not be able to learn to be good enough to use the great new supplies. Support from friends and collectors can help shout down that panic. There are people besides your mother who love your art. There are teachers who knew you had potential and some of them brag on you. There are friends who paid you good money to paint something. Collectors who met your art before they knew you that became friends - and in that panic, you forget how they became your friends and think they only bought it to make you happy.

Naw. They bought it to make themselves happy. They fell in love with it. You really are good enough to use the great new supplies and they will help you to paint better.

Artist grade art supplies perform better than cheap stuff. Beginners are often discouraged because they see great effects done by professionals and experts, then try it with materials that can't perform that effect. No matter how new you are to a medium or to drawing and painting, you will actually get better results using the brand new artist grade expensive goodies than you would if you'd sensibly gone down the children's school supply aisle in the discount store for its equivalent.

I developed a method for handling that panic. It works for beginners as well as experts who just feel like beginners when facing a new supply or medium.

Start out by charting the good new stuff. Take out your sketchbook or a sample surface - if it's oil paints or something else used on canvas, use a cheap canvas board or canvas pad. Do swatches of it. Make test marks with it. Turn that into a simple left brained task. Label your swatches if you like, this will be an enduring record for when the new 'too good' supply is an old favorite and you run out of the color you use most. This really matters in dry mediums like pastels and colored pencils - when you have several hundred pencils or sticks, identifying the little nub with no number on it for replacement can only be done by going through the charts.

It works with paint too. You can tell the difference between brands sometimes, discover that blob of dried Ultramarine watercolor was the Daniel Smith French Ultramarine rather than the Winsor & Newton one. They have slightly different hues and textures, one will become a favorite.

Now you've broken the new supply's virginity.

If it's a new journal, take a back page and chart one of the supplies you use most in journals - all your ink colors, or a set of colored pencils, handy where you can reference the chart. Leave the front page blank so that later on when you get a good idea for an opening page you can create it. Or design the opening page on printer paper and then redo it on the first page carefully.

There's nothing that says your first painting on expensive Kitty Wallis pastel paper has to be alla prima off the top of your head, from memory, on impulse.

That's the other practical tactic to beat down New Supply Freeze.

First you chart. Then you chart mixtures, obvious common mixtures you've used often in similar supplies. See how the new supply handles. If you've never tried acrylics or oils or something, you'll start to get a feel for how they mix. Obvious beginner mistakes like trying to mix a light green by starting from a strong blue can happen on the mixing page instead of on your first painting. You can put "blue first" next to "yellow first" and see that you got a better green going first with the yellow.

By now you're starting to get a feel for how they handle. There's still the question of whether you can do a painting good enough to justify the expense.

Fight fear with reality checks.

Start doing thumbnail sketches. Do notans. Plan your painting. Do small color studies testing the material on its intended surface. Try out techniques in a small way and plan a serious painting by doing all the preliminaries. No matter what your skill level is, you'll come out with a much better painting doing all the planning studies.

Thumbnail sketches eliminate a lot of composition problems right at the start. Don't just do one. Take a sketchbook page and something common like an HB pencil or a free ballpoint pen from the grocery store and draw a dozen of them. Spend only a minute or two on each thumbnail. Pens are good because you can't go back and fix mistakes, you have to start over if a dark mark goes where you wanted light.

Choosing the best of the thumbnails, work out a value sketch in a bit more detail. Refine your idea.

Then do a color study, not full size, just work out the mixtures and exact hues and textures you'll want in the final painting.

Scale that up to your full planned size and wow... all of a sudden the first page in that Stillman and Birn Beta watercolor journal has a gorgeous watercolor or acrylic landscape on it. Your first pastel painting on sanded paper has depth and richness, it's a worthy painting. You look like a better artist than you really are.

Or rather, your skills shine at their best, because the really good artists out there are going through all those preliminaries when they do the knockout contest entry paintings that left you feeling so awed. They have sketchbooks with thumbnails in them. They have notans that were not worthy. They did color studies that came out ghastly and drew things misproportioned and goofed up putting in a cloud that looks like a horse when they didn't want a surreal flying horse fantasy painting.

Or they got that by accident in the color study and decided having a horse materialize out of a cloud would be a lovely spiritual or fantasy painting, ran with it and used the idea the mistake gave them. Mistakes are serendipity. Every stage of the process of breaking in your new supplies will teach you more about using them until your first piece with them is not only your best painting, it's better than you even thought you could do.

Reality Checks always trump the New Supply Freeze.

There's a reason it cost that much. That's care in its preparation, finer milling, greater pigment load, more expensive valuable pigments, unique effects that only that brand has in its proprietary chemistry and methods. The good news for self indulgent hobbyists who buy the best is that they will learn faster and consistently get better results.

High quality art supplies pay for themselves, including with shorter learning curves.

If you're a beginner starting watercolor, choose a smaller palette of colors and get expensive artist grade paint. It's stronger. You'll find out the small tube of artist grade paint will thin out and cover a larger area than the big tube of cheap student paint. You'll get effects with it that don't work as well with the student grade paints too.

My example is my first test with Derwent ArtBars. That is not actually a painting under the color chart. It's an idea for a painting, a quick color study done with Derwent ArtBars where I tested dry over dry color mixing and then washed it, tested wet in wet color mixing, swiped a wet brush over the watersoluble sticks to see how it handles as paint, did all sorts of things with it. Because I worked over some of the tests they're not as neatly organized as the examples I'll use in my review of the product. Because I just made up some of the rocks, they don't look as good as they would have if I'd set out some pebbles on my desk to sketch them from life.

It doesn't matter. That page let me find out how to handle my Derwent ArtBars and thus when I do the final version of ArtBar examples, they'll make more sense to my art supply review readers. That one was for me. The sticks aren't virgin any more and have now joined my sketch supplies. I will probably do more muted mixtures in the good example painting that I create for the review - but this one has the necessary mistakes to make my review illustrations look more professional.

Enjoy your new supplies. Just play with them and don't take the playful results that seriously - your first real painting with them will thank you for all the preliminaries.

Monday, March 12, 2012

Colored Pencil Shading and More


Today's art lesson is on colored pencil shading, especially skin tones and cylindrical objects. What do a brick silo and someone's face have in common? Well, both of them need to look three dimensional in your drawings. You'd be surprised how dark the shadows are compared to the highlights.

Your box of colored pencils usually gives you a light peach color that may be labeled Flesh on the assumption that anyone whose skin is Burnt Sienna or Cinnamon or Raw Umber will just get the artist pigment. So you're drawing someone pale and you fill in the face with that color. Fine. If they're a cartoon with black lines, you're done. Fill with flat color. But even in a cartoon, a well defined tan shadow will give that flat face a three dimensional look.

When you're trying to draw realistically, it'll be frustrating to look at that outlined face and get the color right but somehow be left looking at a pink cartoon instead of a three dimensional person. It's one of the huge mental flips every artist goes through in learning to draw - shadows are darker than you think they are. Things are not the color they are. What the heck kind of color is Flesh anyway, it looks like a plastic band-aid compared to anyone's real skin even if they're pale!

"Flesh" or as it's sometimes labeled more accurately "light peach" or "orange tint" is a highlight color. It may sometimes be a midtone color for a very light complexion where you'll use Ivory for the highlights or best of all, go very lightly with it and then burnish over it with Ivory.

The key to shading with colored pencils is not to go heavy till the last layer after you establish your shadows and mix your colors. The first illustration at the top of this lesson is some mixtures I created with a 12 color set of Derwent Inktense. I can do a dark or pale skin tone with any colored pencils I have in hand. It's a matter of pressing lightly and going over the shadow areas more than once with different colors.

Try this at home. Get out your colored pencils. See the shading bars. Do those with every one of your pencils - start out with a heavy application on one end and then color in pressing a little lighter as you move across toward the right. Or do them in reverse - start by barely touching the paper with the point of your pencil and gradually apply a little more pressure.

Below the first shading bars are the ones with the refined technique of Little Circular Strokes. This technique you just don't ever press hard. You just go over it again and again till it gets dark. Best to start from the light end and then work over and over it till you get to the far end.

Look at how most of those examples have lots of little flecks of paper coming through. You probably hate that. I did when I started with colored pencils. I ground down hard to get rid of them. You will, later, with a colorless blender pencil or a white pencil. This is how your colored pencils shading should look right up till the last burnishing layers if you want to expand your color range by combining colors.

These are light tonal layers. The shading bars demonstrate the variety of tones you can get with that color. What a very light application of Baked Earth looks like is quite a bit like Flesh, isn't it? Close to that light peach that people with pale skin have? If your set has at least one reddish brown like Sanguine, Henna, Baked Earth, Burnt Sienna, Cinnamon... then you have an easy one-layer skin tone base much better than using the Light Peach highlight color as your mid-tone.

The simple easy way to do skin is to use a reddish brown to create a value drawing of the person as if it was a shaded graphite drawing. Then go over that with the Light Peach as a burnishing layer. It's plausible. Not very exciting and we can get much richer skin tones paying attention to reflected color and shadow colors and so on, matching the person's exact complexion, the color of the light and the color of anything reflecting into shadows in true colored pencils realism. But if you just want a nice drawing that reads as a pale skin tone - that will do it. Maybe with a touch of dark brown in the deepest darks.

Practice those shading bars to gain control of your hand pressure. They make a great doodle. Keep a few stubs of colored pencils in your pocket or purse when you're at work and put shading bars on sticky notes, on used envelopes, on any scrap paper laying around. Anytime you're on hold, play with the pencils and try to control exactly how dark you get by pressure alone. The control of being able to create any value you want with a colored pencil is what will let you layer Fuchsia and Leaf Green (muted dark green almost a gray green dark) and put orange over that and somehow get a rich natural skin tone instead of a murky mess. My test swatches above are simple combinations.

Light tonal layers are the basis of colored pencils realism.

You'll find this technique in every good colored pencils instruction book. Exactly what strokes the artist uses to get soft gradations and smooth flat tonal layers will vary. Several of the professionals prefer keeping the pencils very sharp and doing tiny circular strokes.

I personally developed a habit of wearing down the pencil to a blunt point and letting it glide lightly over the paper in random directions, larger strokes. I go over a flat tonal area more than once touching on any patch that looks lighter than the rest. The only advantage of my self-invented Blunt Pencil method is that it's faster than sharpening it to a fine point and very delicately touching that fine point to make a smooth gradient. It took a little more pressure control to keep it from being blotchy, but I don't have to stop and sharpen the pencil as often.

Use what works for you in terms of sharpness, what direction your strokes overlap, how you keep them from forming accidental patterns in the smooth areas. Try for shading bars and also for flat areas of color - color in doodles with smooth tonal layers. Try to create three different middle values with one dark pencil - light, medium and darker medium - not counting "press hard and fill in every speck" as one of them.

Coloring books are a good idea for colored pencils artist. No, I am not kidding. Get one with good drawings and a theme you enjoy - flowers, tropical fish, stained glass patterns, dinosaurs... whatever you think is cool and wouldn't get bored coloring in. This is not just a child's toy. It's a grown artist's practice in controlling color and pressure without bothering to go through sketching the outlines first or planning a painting. It's color study at its finest.

For additional benefits, find the Human Anatomy Coloring Book that is still used in medical schools. You'll come to understand the human body better from studying how the bones fit together and the muscles fit on the bones, where veins run closer to the skin, the shapes of eyeballs - there is a lot you can gain from an anatomy book on how to draw human beings even if most of the illustrations are cutaways.

Also it's fun to make up your own colors. You could shade each little bone in the human hand three dimensionally as if it's a different color of fluorescent plastic. Tip - shade with a dark version of the color and then burnish with a light fluorescent color. Or trace that one out on good paper after you've planned the colors, fill in the background with black and actually hang the Fluorescent Human Hand Bones on the wall as a fun poster. You can get creative with coloring books.

Or go completely against what the subject is. Take all your browns and accent with spectrum colors, turning a book of butterflies into human skin colored butterflies. Give your dinosaurs human complexions. Whatever you do with the coloring books, it's less boring than just doing little square swatches.

Except when you have a painting in progress.

That's where leaving several inches of margin on your good Stonehenge or watercolor paper will let you test color combinations for specific areas of the painting - the way the green shirt reflects up on the underside of someone's earlobe is a good example. Or exactly how the colors shift in a pearl earring and how much easier it is to get that with overlapping tonal layers than just reaching for the French Grays in your Prismacolor set. The pearl will be more iridescent if you use the grays to establish value and then overlay different pale colors with each other to create varying, subtle and spontaneous grays by mixing complements. Pink and a light mint green make a good gray!


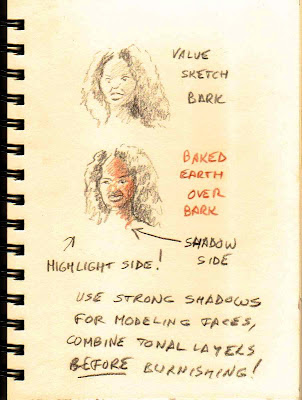
Here in this illustration I rapidly sketched a girl with the darker brown, Bark. Here's those tonal layers in action. The first layer, use the darkest color to lay in just the areas where shadows are deepest. This layer establishes value. Using the darkest pencil very lightly helps unify the shadows too, it isn't that obvious once the colors are mixed but it keeps the drawing from looking monochrome.

Then I sketched a similar head with the same values in Bark and went over that with the Baked Earth warm reddish brown. Any russet or rust color will work for this. Just use less pressure if it's a darker rust color and more of the darker color under it if you want it deeper than the value of the pencil used full blast.

This is the simplest skin tone mix - dark brown and rusty color on paper, using the white paper for the highlight. I did this on a cream colored page in my Stillman & Birn Delta art journal, so it's got a natural highlight color. If I were working on bright white paper I might have extended the Baked Earth all the way into the highlight but barely touched the tip to the paper, fussed over getting exactly the very light value of "bright sun on skin."

But back up in the swatches I tried some other combinations. Dark Indigo or some other deep blue or violet in shadows can look natural too. The color of the sky reflects into shadows. Using cool deep colors like violet, blue or green in the shadows of faces can make the skin color richer and more natural.

The old Italians, both the ancient Romans and the Renaissance painters, used green for the shadows on skin and went over that with the pink highlight color. This produces a rich skin tone and takes advantage of the effect of complementary mixing. Complementary colors are what's opposite on a color wheel - complementary pairs are violet-yellow, red-green and orange-blue. Mix them in the right proportion and you get gray. Mix them unevenly and you get a muted cool color or a nice brown.

It's that nice brown that often works well in human skin tone shadows. It'll be cooler than the highlight color. One thing I always did in Prismacolor painting was to intensify the light with Cream (Ivory in some other brands) by using it as the burnishing color on all the sunlit areas of the subject. Then I'd use Deco Blue or Lavender as a burnishing color in all the shadows. Bang. You do that over the local colors and all of a sudden the sunlight or indoor light is warmer and more intense. It doesn't change the local color of the subject. It just makes the light a little more obvious and the painting a whole lot richer.

For practice getting the values in someone's face right, use any dark color you please or a graphite pencil. Draw a tonal drawing from a photo or do your own left hand from life. Don't outline anything. Look at the edges between light and dark that are sharp edges, like the edge of someone's cheek against dark hair. It helps to take your photo reference and put it in gray scale on the computer so you can see the values clearly. Or just use a black and white photo, vintage photos are great for this.

Draw monochrome people until you're used to doing them as masses of tone. Then do a tonal drawing in your base dark color - deep brown, deep green, deep violet or blue, whatever you like. Shade up with tonal layers of rusty reddish brown and other colors until you have the skin tone colors right.

One artist who did beautiful realist portraits used to underpaint her Prismacolor portraits with bright pumpkin orange. Yep. Screaming orange. The translucent pencils modifying it produced beautiful rich skin tones in the half dozen or more layers she used to build on that orange layer. The orange wasn't that visible - but white over the orange used heavily made a good highlight. Cool colors over it instantly turned brown. Try that on watercolor paper - you can combine this with practicing a specific feature like ears or noses to get still more practice with tonal colored pencil drawing and color mixing.

Onward to the bonus lesson!


A friend of mine had trouble with a farm scene that had a brick silo in it. The barn was in gorgeous perspective and looked three dimensional, the silo looked flat because it wasn't shaded. Also the lines of bricks going around it were drawn more or less straight across, like it was one side of a rectangular silo instead of a curved plane. Curved planes are tricky.

But if you want to draw people, curved planes are essential and silos are a good place to start because they're a cylindrical object like limbs are. Bricks and sunburned faces are about the same hue if not the same value, you use the same brick red, russet, rusty red for both. Since I had the pencils out I just sketched how the perspective works for bands going up and down a cylinder in perspective.

This matters a lot. Pay attention to it in still lifes too. Vases are cylinders. Glasses are cylinders. Cans are cylinders. There are some geometric ways to calculate the exact curve, but I'm lazy and I freehand things. I eyeball it. The trick to eyeballing it is to know what to look for.

Practice drawing cans from life. Peel the labels off or wrap printer paper around them so that you don't get distracted by the lettering - or turn them so that the lines of lettering form curved lines going around the three dimensional surface.

When you're above the can, the top is an ellipse and the bottom a quite deeper ellipse. Set the can on the floor or a low table and look down at it. Got that? Sketch it from life that way, trying to get the curves accurate for how deep the ellipse is on the top and the exact curve of the bottom of the can.

Don't feel bad if you don't get it on the first try. An amazing number of otherwise brilliant painters reverse those proportions and destroy three dimensional accuracy when they do. People who charge hundreds of dollars for their paintings cleverly put flowers or something in front of the bottom of the vase so they don't have to deal with the ellipse. Or it's off by a little but you're so distracted by how beautiful the flowers are that you don't care.

Now try putting the can above your eyes. Hold it up, or sit on the floor next to a glass table looking up at it. You get the same thing in reverse - a simple oval of the bottom, a much rounder section of an oval at the top. If you use a clear cylinder like a water glass you will see the whole shape of the oval at the top doing this. With an opaque can, you'll see a section of that top oval.

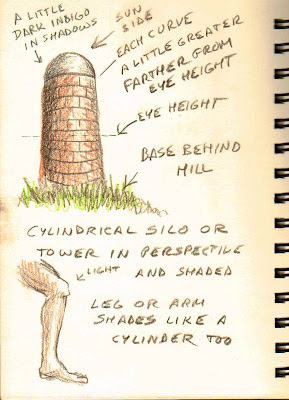
Now back to the silo. Because it's a big cylinder taller than the artist, your eye level may fall right in the middle. What this kind of perspective does is tell the viewer where your view point is! There is no exact right way to do it in all instances. There's choosing that eye level to create the way the silo looks if you sat on the ground or stood up or stood in a ditch looking up at it.

The curves go in opposite directions if eye level is in the middle of the cylinder. Get out a mailing tube and put that on a table if you want to see this in person. Look up at the top - the ellipse will curve away from you at the outside, highest in the middle. Look down at the bottom - in this example, hidden by some foliage. The middle is the lowest part.

In between, any bands like lines of bricks or the ridges around the middle of a clean empty soup can without its label will become less prominent as they approach eye level. The line that's exactly at eye level will go straight across and not curve at all, if it's there. It's a little more esthetic to arrange the ridges so they curve slightly up and down around a space rather than a straight line, but either will work. I did the straight line version on this example.

Try this at home. Bare soup cans are very good for the exercise. In the case of photos of buildings, the camera can sometimes add extra distortion, which is why it's important to know how it works. Get the perspective on cylindrical buildings right and your towers, silos, flag poles and other cylindrical objects will look three dimensional even before they're shaded.

Look carefully at the direction of light or decide it if you made up the subject from imagination. More shadow will show curving around the side away from the light than the side near the light. But a little shadow will usually show even on the light side as it curves away from you.

Practice drawing short pieces of plain white PVC pipe to get cylinder shapes. This is also good for realizing just how dark shadows get on a white object - they will surprise you, going all the way down to an exact middle value or even darker depending on how stark the lighting is. Don't be afraid to push the darks. This doesn't change the impression that it's a light colored object.

What it does is show the viewer that strong light is falling on that white thing and it will still seem white even if the only bare paper is a tiny highlight on the vase that makes it look glossy. But that's another article - shading white and light things is its own study. For now just practice cylinders and skin tones, have fun with it and be sure to have extras in that rusty color because the more you do people, the faster it gets used up!

Wednesday, March 7, 2012

What Is Plein Air?


A good friend of mine on WetCanvas just asked me something in a note that gave me a good topic. A good free online course on Plein Air painting by Larry Seiler just started. I wasn't able to attend because I have conflicting commitments on the evenings he teaches, but my friend's question made me think.

"What do I do when I can't get out to paint plein air?"

First off, "Plein Air" really means "Paint Scenery from Life."

You don't have to get Out in order to do it. You can sit in front of your living room window and look at the scene you see every day, sketch it throughout the seasons or choose parts of it to do a painting. Snow, rain, sun, green or brown, you'll see different things every day following the same window and this does not demand having transportation, mobility or the stamina to bundle up and get out doing snow scenes in subzero weather.

You can even do interior paintings instead of outdoor landscapes and paint from life. That's still scenic, especially if a window's scene is part of the scene. Most contests list "landscapes and interiors" in the same category. So the room you live in can become as interesting as Vincent Van Gogh's little yellow room in Paris when you simplify it and choose the right viewpoint to show perspective and organize the painting. It takes the same skills as doing it outdoors and the light will still change in a few minutes, steadily, all day.

You can look at the scenery on your street instead of driving out to the wilderness. Urban landscapes are still plein air. Or drive out to the wilderness or get a friend to drive you - but then stay in the car painting through the window so you don't freeze and your paint doesn't turn into a solid ice cube.

There are also ways to simulate it for places you can't travel. One of the more interesting ways I've found to practice for plein air sketching is to put a nature video on television or on my computer and try to sketch something from the background of the video while it's running. It's all right to play it a few times over and over to really get in everything you want, but that's a good simulation of dealing with real wildlife. They're moving. So is the camera angle. So is the light.

You're not stopping to exactly copy nature drawing from a video reference. You'll have to average where the branch of the tree is when the wind's moving it around, instead of measuring it from the reference.

You can also ask a friend with a camcorder to go to a good location and take videos for you to paint from. That can help too.

What are the real advantages of plein air? They are the same as painting or drawing anything from life. If you have to rely on photos, it helps a lot to go outdoors and look at similar things. Set up some pebbles on your balcony or patio to look at the real color of their shadows on sand, maybe in a little dish of sand. That will help you compensate for the color and value distortions of photography.

The main point of plein air painting is to get accurate colors and values, a truer look at what you're painting than you'd have if you were painting just from the photo. So don't forget that you do have a memory.

I did the watercolor painting above, that little waterfall, from a reference. I supplemented it from memory though. I could not help remembering details of places with small creek waterfalls that I saw as a little kid on family road trip vacations out West. I remembered waterfalls I saw in my twenties when I couldn't paint but spent hours staring at them trying to remember how they looked. I remembered an artificial one in a conservatory set up to show off various mosses and how natural it looked - how perfect it was compared to the one shaded by trees that I'd seen as a little kid. I remembered all sorts of times when I saw white water in person.

The more I learn to observe from times I'm looking at it in person, even if I don't have any sketching tools in hand and before I was able to render these subjects, the truer my paintings are when they're done in the studio. Plein air painters usually bring home their small works and color studies. It's a comfortable size to paint 8" x 10" or 9" x 12" outdoors and then develop it into a much larger, more detailed studio painting later with the photos taken at the time on the trip.

Remember, you don't have to treat nature as if you were a camera. If there's an interesting little corner where weeds grew up through the concrete, you can just turn the concrete into dirt and leave out the rest of the city. Draw that little weedy bit and you might as well be out on the prairie. Intimate Landscapes are often easy to find in urban and suburban areas, especially when anyone's yard or garden has been neglected.

If you have a balcony or patio, you can get large pots and do deliberate plantings to give yourself something to paint just the way Monet designed his gardens. So what if it's no larger than a two foot wide box? It's still beautiful, still worth painting. Doing something like that at home has the advantage of returning to the spot day after day, season after season, to know it well in all its changes.

The little watercolor I posted with this entry was painted under similar time constraints as if I was painting plein air. It's a copy of a demo painting by Johannes Vloothuis. He edited his video, there were many passages that he cut past repetition of what he'd just done to get to the next bit that needed explaining. Or let paint dry offstage between cuts. So I worked smaller and worked fast to get it all in before the video ended, while I could still look at the broadcast.

Anytime you turn on Animal Planet and paint something in Africa or Australia or the UK or the USA, somewhere you don't live, try to finish a small study before the video ends. That's your best practice for actually painting outdoros under changing conditions. My painting did not turn out as a copy of Johannes Vloothuis's painting, not even a miniature. I changed a lot of things to simplify the scene and make it work.

Surprise, when you're out looking at a real mountain from a car window, it's okay to leave out the telephone poles or leave out that inconvenient ugly tree, or move it to the other side of the road. You're creating a painting, not snapping a photo. While most plein air painters are trying to record the scene for later use as a reference, others create beautiful paintings on the spot that are composed as much as a Hollywood set. The world inside the painting doesn't have to match the world outside. It only needs to be a good painting that pleases you and serves its purpose - and sometimes that's just remembering what color the sun on the trees was and the real value of shadows that turned black in the photo.

It's frustrating, especially if you haven't got a car or have mobility problems, to look at these happy hikers heading out with French Easels to trek over miles of rough terrain and come back with grand paintings of dramatic scenery. But if you can't paint the scene you love, paint the scene you're with...

Wednesday, February 29, 2012

Blocking In, Blending and Light


Blocking In is a technique often used in pastels. The general idea works in any medium but this article focuses on soft pastels techniques. Simplify the forms of your painting to big shapes. Ignore details and small areas unless those are in the focal area or demand reserved white.

Above is my block-in for "Lady Sunshine," a tabby cat painting. I did this one for a Pastel Spotlight challenge on http://www.wetcanvas.com that shares the same subject as this essay. DAK723 wrote a wonderful essay and demonstration of Blocking In.

Why do it? Several reasons. It lets me define light and dark masses in the painting so that when I finish it, I still have unified masses. It changes the color of the paper. I used a light gold piece of Canson Mi-Tientes on the smooth side and blocked in with Color Conte hard pastels. I worked lightly, just establishing areas of light and dark.

Most times I would smudge the block-in with my finger. This time I decided to go with sticks blending and keep the background very loose. I knew I could go back over that dark blue with a gold or reddish gold stick or play with olive greens over it to get a very natural variegated background hinting at foliage.

In a simplified version of the Colourist Method (which I will go into in later lessons) I used cool colors in the shadow areas and warm colors in the light. Most of this painting is in shadow, the cat is backlit and I really liked that dramatic lighting. The sun's coming over that bush or hedge or whatever to strike her from the upper left - mostly upper, more than left. It's on her forehead, it's all up and down the side of her we don't see and it catches the fur at the edges of her body with a delightful glow.

So I deliberately left bare paper around the block-in for the cat's shape. I put in a couple of dark marks for her features, mostly just placed her eye and a nose detail. I used a warm violet to block in her body because I wanted to stay a little close to the final color of her fur. Violet shadows are very natural, red-browns over it will give it a cool muted look.

So there's the block-in. When doing it, you can adjust the big shapes but on an animal, accurate proportion is important. Pastels are easily corrected. When it's a landscape, it's much easier to completely change the shapes to make a better composition. With a live animal those changes are limited by its anatomy. I added a bit more cat to the reference photo and was able to place her shoulder blade under the fur because I got used to sketching Ari from so many angles.

To get used to sketching cats, read my earlier article, How to Draw a Cat. This is what to do once you have a good cat sketch and want to copy and enlarge it to do a good cat painting.

You can enlarge your sketch mechanically with a copy machine or using your scanner as a copy machine. Just set it to enlarge and then move it around on the pastel paper till you have it where you want it. Rub some dry pastel on the back in a color that contrasts with the paper and works with your subject - violet sketch lines are often good for many subjects. Then trace the lines of your sketch and keep them simple.

Block in the shapes with a piece of a stick of hard pastel. I turned the pieces of my color Conte crayons on their sides to get big loose rough strokes.

Blending this block-in is a good idea on white paper. That will eliminate white specks completely. I liked the gold paper and didn't mind having a little of that show through either on the background or on the cat so I didn't blend the block-in at all. That's a decision to make per your painting.

The sketch-enlarge-block-in method will work for any subject, but cats are one of my specialties. So here she is finished - "Lady Sunshine."


What I did after the block-in was another layer just establishing basic color. I should have scanned that stage - I laid in red-brown over the cat shadows and olive green over the blue background to get it closer to true color. From there I began working over it with a variety of colors. I brought a touch of dark violet into some areas of the background, some dark brown, some yellow ochre and burnt sienna and more olive greens. I even used a few strokes of turquoise.

I decided to push the background into the distance so lightly finger-blended the background to diminish its importance.

Finger blending in pastels always dulls the colors. It'll give beautiful soft edges the more you do it and let a little bit of color go a long way. It gives beautiful gradients and shading. It will also diminish the intensity of colors a little and lose the "sparkle" that makes pastels such a rich medium.

By blending the background and using sticks to blend colors on the cat, I pulled her forward and gave her more texture. She's in focus and the background's not.

I worked over the edges of her fur with a white stick, pulling strokes out in the direction of the fur. Using three different shades of bluish gray, I started following the reference for her markings. She looks like a swirl tabby, doesn't have the little even stripes or spotted stripes of a mackerel tabby. Some stripes were more prominent than others. I also scumbled lightly over the red-brown with a light gray to lighten some areas and bring it more into a "Brown tabby" range than a ginger cat redhead color.

I didn't have a nice assortment of grayed browns in my set. The color came out richer for my using a bright red-brown followed by a little bit of gray. Why that color doesn't really show other than shifting the hue of her brown stripes but the dark gray "black" stripes show prominently is how hard I pressed.

Try this at home. Lay down an underpainting in one color, then add a related color one step over on the color wheel fairly heavily, then go over that very lightly with a near complement to mute it. Practice with the last color to see how much effect you get pressing lightly, barely touching the paper with the stick, pressing medium, pressing hard and really grinding down on the stick.

How hard you press the stick and what kind of motions you use in pastels make all the difference.

Finally I went into her light areas with white, ivory and a light yellow ochre color. I detailed her face, which is definitely the focal area. I put some whiskers in with the white stick and then applied SpectraFix fixative. I used a little too much so I wound up restating her whiskers with pastel pencils.

Final details, I used flesh pink, yellow ochre, ivory, red-brown, blue-gray and white pastel pencils to adjust small areas of color and shade between that brown area and the highlight on her face next to her nose. She doesn't actually have white fur there, it's just sun glinting on her shiny face fur.

Work with a good reference photo or work with your life sketches while your cat is actually in the room. Your colors will be a lot truer if you're looking at the real cat while you're painting.

Last tip - reserve the most detail and the most contrast for the focal area. Tat is her eye and generally her face. Her face markings show up stronger than the stripes on her neck and back. The contrast of her backlit fur is continuous but the soft edges of it down away from her face help give a fuzzy impression - as opposed to crisp strokes on her eye, the detail of her ear, her nose.

Enjoy! Definitely try this at home. You can copy my cat if you want to or you can have a really good time painting your cat from the best of your life sketches. Be sure to pay attention to the direction of the light and the shapes of shadows. If you draw the shapes of shadows accurately, you will have the shape of the form right and on top of that you'll give it good three dimensional volume. Don't let your cat sit in the pastels tray though!

Sunday, February 19, 2012

Waterfall Demo Hard Pastel Techniques


If you have Color Conte sticks, Faber-Castell Polychromos pastels, Sanford Nupastels, Derwent pastels, Cretacolor Pastels Carre, Gallery Mungyo Artist Semi-Hard Pastels or Richeson Semi-Hard Pastels, you've got Hard Pastels. They come in sets of 12 to 120 in different brands. Usually they're narrow firm square sticks that can be used interchangeably or with Conte Crayons. The only difference with the Conte crayons (including Color Conte) is that those are baked to give them a different texture.

Pastel pencils are close enough to hard pastels that you could try these techniques with them. The biggest difference is that pastel pencils can't be turned on their sides for wide strokes. I didn't use that technique in this painting, so feel free to get out your Carb-Othellos or Derwent Pastel Pencils, whatever brand you have.

I used a smaller 24 color set of Color Conte to create this Waterfall Demo painting. It's actually my homework for a free all-levels beginner to master class by Johannes Vloothuis, "Essentials of Painting Waterfalls" - find out more at ImproveMyPaintings.com if you want to register and attend the final watercolor demo in the three-part series or register for future classes. Upcoming topics include Rocks and downloads of previous courses including Skies, Trees and other landscape topics can be found at the North Light Shop. The downloads aren't free but they're loony cheap compared to other high quality art instruction videos. You can also check out the downloads of last year's "Paint Glorious Landscapes from Photos" three month course and either order them all at once or buy each in turn as you work through them depending on your pocket money. The cost definitely falls into "pocket money" for anyone with a job and the videos are fantastic.

Mr. Vloothuis will also make a large Photo References pack available at North Light Shop - if you tried to find it at ImproveMyPaintings.com and got confused, that's why the buy link wasn't there. He's expanding it too, even more good images to work from.

Yes, I am still a student as well as a teacher. I'm not even going to try to convey everything Johannes Vloothuis taught me about painting waterfalls. Because I did my homework painting in stages and took progress scans of it, I'll focus on a different lesson - hard pastels techniques. If you have pastel pencils instead, they're pretty much the same thing except that you can't turn a piece of a stick on its side to scumble. I use the tips for most of my techniques so pastel pencils are fine.

I used a blue-violet pastel pencil for my initial sketch on Art Spectrum Colourfix Suede. This is a coated pastel card very similar to ClaireFontaine PastelMat. It's good stuff - a little pricy but it holds many more layers than plain non-sanded pastel paper or sketchbook paper would. Work lightly if you're using plain paper. Sanded pastel surfaces like regular Colourfix or Uart or Ampersand Pastelbord will take more layering. The last thing you need besides some hard pastels (or pastel pencils) and a surface is a kneaded eraser for lifting color to restore tooth if you change something or have trouble lightening a detail.


I can't repost the photo Johannes Vloothuis provided for our homework assignment, but I'll describe how I arrived at this sketch. First, I opened it on my laptop and enlarged it bigger than the window. I tugged the window to the shape of my paper and then moved the sliders till I got exactly the crop I wanted.

I loosely sketched the shapes of the rocks and water, freely changing them to make them look better in my painting. This is another way to use photo references. You can move things around. You can add things from other photos or work from your own previous life sketches. Don't copy the photo. Think of light and dark masses like a notan, just shapes that make an interesting pattern.

I loosely scribbled over the darker areas to have that connected design because the blue-violet was one component of my rock color. Violet makes a good sketch color because it harmonizes with every landscape hue. Even if you work over it so completely that you can't see it, it will darken yellows without turning them green and blend in better than charcoal, which can change hues more. I had so many blues in this painting that I wasn't worried about it being a bit bluish. I'd use a medium value violet that was less blue if I didn't have that much rock shadows and blue water shadows.

Pastel pencils are a little easier for this kind of linear sketching. You don't need one though if you haven't got it handy. A hard pastel stick gets a line just as good if you hold it at an angle and roll it in your hand to use the different corners for a tight line or small detail. When you've rolled it around a few times the tip will wear down into a cone with a point. Scribbling in the dark areas, I held it at an angle and got a nice chisel tip back on the square stick with sharp corners for detail. In a way hard pastels are more convenient because they are self sharpening.


My second stage is the Block-In. I filled in the dark rock areas with flat color using a slightly darker blue-violet Color Conte and finger smudged them so that I'd preserve the tooth. I used pink and orange on some rock highlights in the back but smudged the blue-violet right over them to make a more muted color. I used a light Peach stick for the highlights on sunlit rocks. The background cliff is entirely in shadow, so it's all some variation on blue. The sunlit flat planes are a bright light peach because I wanted a bit of dawn color in the composition. You could use any warm color.

Using spectrum bright colors in the BLock-In stage gives a shimmer of strong color even when you go over them with complements and more neutral sticks to come closer to the local color or true color. This block-in layer I was painting the light on the forms as if they were white Styrofoam shapes instead of rocks. Because I wanted very light foam on the water, I left all the water area white and just painted the blue shadow areas onto it after rubbing the blue shadows smooth with my fingers.

The scene is shaping up even as a finger painting. This layer is important. So is blending this layer, because especially on non-sanded paper, a blended layer takes more color easier than if you're adding color over color. The "Block In" layer is also called an Underpainting. I let the white stand for white but if I was working on a colored paper, I would have blocked it in with a white stick and rubbed it smooth.

Don't worry too much about edges when blocking in. They can be cleaned up later on and if it's a smudged, blended layer, it's easy to go over with other colors. If you err, drag the lighter color into the darker one. Sometimes with hard pastels white does not go over dark completely. If that happens, you can either erase back to the surface with your kneaded eraser or use a softer pastel to touch up the lost white or light accent.

If the painting was larger, I could have done the filling in by turning pieces of sticks on their sides and making wide strokes. The main reason I didn't is that this is only 5 1/2" x 7 1/4" and so the width of a stick was enough to just scribble the color in. Don't apply it carefully or worry about white specks showing, the finger blending gets rid of those.


This scan shows progress toward the final image. I started correcting the colors with other sticks. I stopped finger blending on this stage. Where I had colors that were too light, I darkened them and changed them. Some magenta over the peach brought it closer to "red rock in sun" and then I cooled it more with a violet stick. I went back over it with the peach again, blending it back and forth. This gives a different texture than the finger-blended areas.

Stick blending gives a fresher, more sparkling look. Colors that are pure tones are more intense in unblended areas. Often colors right next to each other on the color wheel don't diminish intensity - if you use yellow over red, you get a slightly brighter red. Use complements and you will start to gray the hues.

I brought some pink and orange tones into the sunlit water areas. They came out a bit strong even after I went over them with the white stick to lighten them to the pale tints that I wanted. This is where I've got to say it - a big set is better than a small set! I would have had lighter pinks and a good ivory if I still had the 48 color set of Color Conte and definitely would have had many more good tints if I'd crossed the room and got out the big box of 120 Gallery Mungyo Artist Semi-Hard Sticks.

The challenge with a small set is to get tints by putting white down first (so the colors don't stain the white paper), then go very lightly over that with the colors that you're trying to fade to tints, then go over them with the white again. Sandwich the colors between layers of white. I used the color first without that layer of white for them to slide on and so the tinted foam areas were a bit too bold especially at this stage.

I built up that blue highlight on the totally wet rock in the middle of the waterfall with the lighter colors I used for the dry rock highlights, so it came out as a deeper, cooler version of the same color of rock. Just darker because it's wet. I built up the lighter highlight on the rocks at the left too. I played with the shapes some more adjusting them.

By this point I was paying more attention to the painting than to the photo reference. Once you have your forms down, photo references are mostly good for details. When it's rocks, you do not have to get the likeness of that specific rock. Just make it look like a rock. You can pull a pebble from a bag of gravel and draw from life just as easily.

One thing I liked from the photo reference was how many of the original rocks broke in a blocky way. They formed natural crooked stairs with defined, cube-like planes of highlight, lighter shadow and deepest shadow. This type of rock gets good depth into the painting. So I built up my rocks keeping that in mind and didn't wear them down to more rounded shapes like a stack of dinner rolls.

As you sketch rock shapes from imagination, pay attention to the angle of the light. You can mark it with an arrow outside your sketch at the beginning so that you don't forget. Make sure the highlights are all facing the light, brightest highlights are at a 90 degree angle to it. Deepest shadows are at 180 degree angle to that sun angle - like the undersides of the crevices in the rocks.


Final stage. I worked over those gold and rose tints in the sunlit water with white until I had them as pale as I could get, the scan still shows them a bit darker than they are in the real painting. I lifted some color on them with the kneaded eraser to achieve that pale gold and pink foam with white highlights limited to the brightest areas of contrast as the water slides over the rock. I also muted many of the colors and toned down some of the other contrasts.

I kept the background cliff cooler and a step lighter than the foreground rocks, because it's misty back there. That gives the painting some depth. I heightened contrast right at the center where the water's sliding around the big boulder and the small one. I played with the shapes one last time and decided that was a good finish. I refined the last details in the focal area and slightly smudged around the edges to keep attention in the middle of the picture.

Now that you've seen my stages, you have my permission to either copy my waterfall painting stage for stage or pick out a photo reference of your own. Anything with rocks and falling water will probably work. Don't worry so much about getting it exact as getting the rock shapes three dimensional and the water flowing.

Have fun! The more colors you have in hard pastels, the merrier, but by finger smudging you can make a small set do the work of a much bigger one.

Tuesday, January 31, 2012

Goofing Off is Good Sometimes


January was a heck of a month. I ran into the wall of my limited body energy head first and hard, after over six months of running on empty. A couple of minor problems and one major inconvenience escalated it. The elevator went out in my building for three months, leaving me four flights of stairs every time I needed to go out for anything. The minor problems were my going out for necessities and then forgetting one of them because I was too sick and woozy by the time I got to the corner store.

One extra trip down the stairs too many right before Christmas and bang, my bad back, hip and leg decided to quit. I wound up with a full month of unwanted rest. Not pleasant relaxation. Painful grogginess, sleeping like my cat and stressing out because I had deadlines set up based on my usual pace of living and painting.

Two commissions were both overdue, both of them pieces I wanted to finish before Christmas. I got two out of three paintings done on one of them and the other one, just didn't even get started till that one was done.

I thought I had another month or two on the Sketchbook Project 2012 too. So I'd set it aside in favor of getting important things done, paid commissions that people expected versus a personal project. Went right to the wire on that one but got it done last night and mailed it this morning. It goes on tour in April, that wasn't the "get it mailed in by" deadline.

I'd also signed up for a puzzle painting challenge when I thought I'd have plenty of time to do it. Managed to get that done too. Net result, a lot of stress that may have made it even harder to pull out of the funk. Even San Francisco has winter weather that slows me down. Lesson learned.

The hardest part came during the pain days when I wasn't up to doing anything at all except reading, doing email and playing a familiar computer game badly. That was when the panic set in because I was starting to feel burned out. I didn't want to work on any of it. I didn't even feel like doing cat gestures and couldn't muster the emotional energy to force myself to do one.

Back in 1995 or so, I quit selling portraits in the French Quarter and by the time I left New Orleans, was so burned out on art that I didn't keep any of my supplies. I gave away my oils and pastels and a lot of my stuff to friends except for a few favorite things, most of them materials I didn't often sell that medium. I couldn't let go of the big Prismacolors set.

It took me years to recover from that burnout. I understand it now - it was the massive defeat of my pushing so hard to keep up and survive by doing art that I hadn't had any time to draw anything for fun. I couldn't afford to keep any artwork that came out well. If someone wanted it, I needed to pay the rent.

I didn't understand at the time that I wasn't playing with a full deck of physical abilities. I thought I was a lazy git. Instead, since all physical effort takes me five times the body energy, I was driving myself into the ground. At the end I had days nothing sold because people don't come up and buy street art from someone who's half asleep and racked with pain. They want to see energetic, enthusiastic artists who love what they do, not some bloke who might as well be saying "Got any spare change?" Besides, to strangers if someone's that sick they might be contagious.

I've looked back over that burnout many times to try to guard against it. I don't want to lose my love of art again. This article provided an interesting perspective on art and life: Why Money Won't Buy Happiness. Turns out, there are some unexpected psychological effects to working for the money.

My gut reaction, that it would be dangerous to fall into just doing it for the money, was spot on. Sometimes I have to back up and relax, either doing non-art things on a good day or doing art that has nothing to do with selling the piece. Today's illustration is a life gesture of my cat in Tombow brush pens. They're not archival. It's in my art journal. I'm not cutting that up either, that's personal. So it doesn't need to be permanent and forever.

It's just a cool little sketch of my cat that made me happy. Afterwards, I petted him and we had a non-art moment of affection too.

I need to stick to my personal boundaries on commissions. One at a time, no deadline. It's done when it's done. If it takes longer than expected, even years longer sometimes, the client gets a painting that's stunning gorgeous, years better than I would've done before because I'm always growing. That's even if it's an easy subject because I've got a lot of emotion in it - a portrait of a beautiful cat always gets personal for me.

Where it didn't was when I started worrying about making my Internet bill at the end of the month and relying on commissions to close the gap. That level of need is too much pressure to paint well.

So the thing to do is tighten my belt and start building up some savings again. When I've got even $100 in savings, that's enough that most minor setbacks won't jeopardize the Internet bill. I've had that for the past five years. I got through many computer crashes, cat veterinary visits and other irregular expenses just by having some savings and doing a "loan to self" that I'd pay back the following month if I got a little too extravagant at Blick.

I know I'm not the only one who does this to myself. I'm not even the only extreme that I've known. Too many friends will also drive themselves hard if they're behind, to get caught up, whether that's on time and energy or on finances. Relocation is hard for anyone. I did more than relocate though.

I pushed myself to get out and screen for the San Francisco Street Artists Program and in two and a half months, have not had one good day when I was able to go out and actually use my new license. There's a fifty fifty chance right now that I'll be renewing the license out of pocket and waiting for nicer weather. Though since today was nice, I'm starting to have a little hope that I can get out at least one day before I have to renew it.

All the time I packed and planned the move, I looked forward to getting out of the house on my own. I wanted to go out plein air sketching in Golden Gate Park. I wanted to visit the Asian art museum that's only a few blocks from where I live, or the museum of modern art, or, well, any of a good half a dozen good art museums here. San Francisco is a wonderful place.

I meant to get out on the bus and just roam, get off when I saw something beautiful and sketch it, then develop the sketches into good street paintings. Instead, I haven't even managed a scouting trip to see the artists on Fisherman's Wharf yet. Let alone get that day off just plein air painting in Golden Gate Park with no expectation of selling it or doing anything but filling my sketchbook with beauty.

People who diet go through this process. Grim self control and self discipline can only be sustained so far. If the elevator hadn't gone out, I might have done all those things and by now would have the money to renew the license for a year and just not worry about it. Maybe it's better to do that annual renewal during a good season when I can count on good days to go out.

This entire article is a cautionary tale.

If it stops being fun, take a deep breath. Stand back. Go outside. Bake yourself some cookies or go for a long walk. Read a good book or fry your brain out on a video game. Do whatever it is that just makes you happy when you're goofing off. Two things happen when you love your work so much that it's hard to tell work time from playtime.

1) There is the up side that most of the work time is so pleasant it can feel like you don't need to work for a living. This is real. I've experienced it.

2) The risk is that if you love it that much and spend that much time at it, you can burn out and forget to have any playtime at all. "Busman's holiday" activities are essential. So is plain old time off doing something different.

I have a few mediums set aside for just that sort of thing. They would sell, surely, but never have at any price worth the amount of time that goes into it. Detailed Celtic Knotwork drawings exquisitely shaded and colored in colored pencils or watercolor. Colored Pencils Realism is another good one for goofing off with. Last and most frequent, the maintenance activities that I keep up while I'm working on major projects most of the time.

I sign up for challenges in my art community, WetCanvas. There are several I enjoy, where photo references get posted by a volunteer and everyone does them his or her own way. I didn't have to do the Puzzle Painting piece. It wasn't for sale or for the street. It's a goofy little four inch pastel sketch on my sketchwall that doesn't make sense without its context. But now like everyone else who participated, I'm looking forward to seeing it seamed up with the 35 other pieces to make a complete mosaic picture. It's a game. It was fun. It wasn't even serious practice, though naturally I tried out a few techniques because I could do anything I wanted with it as long as I got it lined up right at the edges.

I considered doing a fisheye effect on it or some other distortion, just for fun. Didn't, but I might with another one sometime.

If I hadn't made the time to do that one, I would have been fried. I'd have felt like a little kid who spent a month looking forward to something only to get told it's bedtime, you can't have it, now it's too late.

That little kid, your inner child, is a real part of every artist or writer or creative person. Drive the kid too hard for adult reasons and he or she will get cranky and start drawing on the walls, or throw a work stoppage.

No one can keep up with every obligation. No one can say Yes to every interesting thing that comes down, every need or want, every fun thing. Sometimes life throws monkey wrenches into plans. That's when it's time to back up, calm down and find something that works to get back on an even keel.

I set my February goals ludicrously low. I've got two of them.

1) Enjoy my Art. No matter what I do during February, whether it's painting a new cat commission or sketching loony dinosaur cartoons or picking up another Puzzle Painting piece, if I enjoy doing it, it counts toward this goal. I keep getting silly cartoon ideas, so why not run with them? That's art too!

2) Save at least $20 a month starting this February, so that I don't feel the pinch this bad again. Yes, it took everything I had to make this move before I was ready to go. That was an emergency though and the emergency is over. Now it's time to start settling in and rebuild my life in the beautiful new place.

They fixed the elevator. I can go out again without spending days resting up from it. I've got Paratransit thanks to some stressful research, calling and paperwork. It's $2 each way to go out anywhere in the city, $4 total for a door to door outing as long as I plan it a day in advance. I might get my day in the park soon.

Anyway, that's also the reason for a month without posts in what I'd been keeping up as a blog with weekly updates. When things started going overboard to get necessary things done, all of my blogs fell off the wagon. I'm glad to be back and hope you're glad too. Hopefully I can keep up a little more frequently now.

But if I don't during February, now you know why. I need a real vacation and getting sick doesn't count as one!